Introduction
I have been using Manjaro (Arch based) for the longest time and I recently decided to switch to using Debian because of reasons listed in a previous article. However, before switching completely, it is a good idea to create a dual boot system, experiment with the new OS and then gradually shift your workflow. This doesn’t create unnecessary friction and results in smoother transition.
Yesterday, I finally took the first step to install Debian and creating a dual boot system that makes it super easy to switch OS on demand. During this process I ended up learning quite a bit about disk partitions, filesystem layout, and how much disk space Linux actually needs.
Understanding the Disk Layout
The first and the most important thing for me to understand before even installing Debian was to understand the disk. Thanks to a Luke Smith video on installing Manjaro (Arch) – I use Arch by the way 😉 – I already had proper disk setup.
In a typical Linux setup you will encounter partitions such as:
- EFI
- Swap
- Home
- Root
One interesting design choice in Linux is the separation of system files and user files. The root (/) partition contains the operating system, installed programs, and system libraries. The /home partition contains user data and configuration files.
This separation makes it possible to reinstall or switch operating systems without losing personal files and configuration. The only new partition required for installing another Linux OS is usually a new root partition, since the EFI partition can be shared. Hence, all I needed was a new root partition to install Debian.
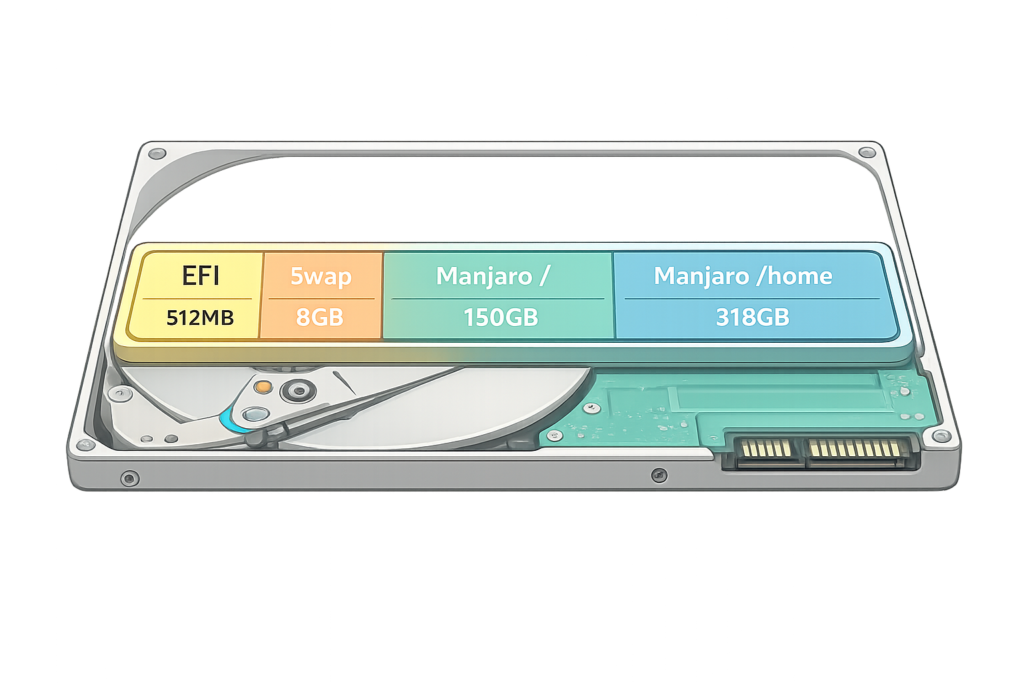
The next part of disk partitioning is to understand the disk layout. The physical disk contains partitions that start and end at specific locations. This becomes important because resizing or moving a partition requires the system to use the physical disk directly. When you resize or move a partition, the system must copy the data to a new physical location, which takes time. Based on Luke Smith’s video, I had the partition like so:
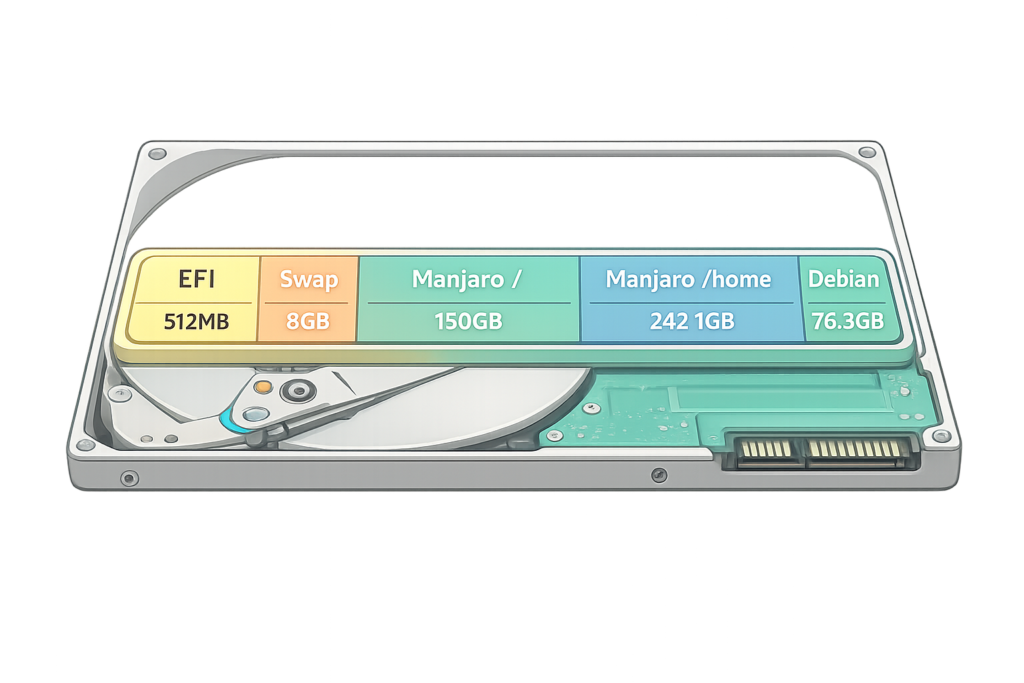
Based on my disk structure, I kept asking question to ChatGPT and figured out, the best approach would be to shrink the home partition and create a new partition for the newly created space like so:
Understanding Current Disk Usage
Now that I understood that I need a new partition for the new OS, the next question was “how much”? This is where the next set of things comes into play.
At first, I figured to understand the space requirement for the new partition, I can use the same size as my current OS partition. The reason is that if I am switching completely from the current OS, I would obviously need to same tools in the new OS. So, I need to know the amount of space that my OS is currently using to help me figure out the space required. So, I went to work.
Here are some of the required commands:
lsblkThis will tell you all the block (storage) devices connected to your system. It will also tell you a little bit about the various partitions, their size, and mount points.
From that, I got the mount point as / and so, I found out the exact space used by my disk as:
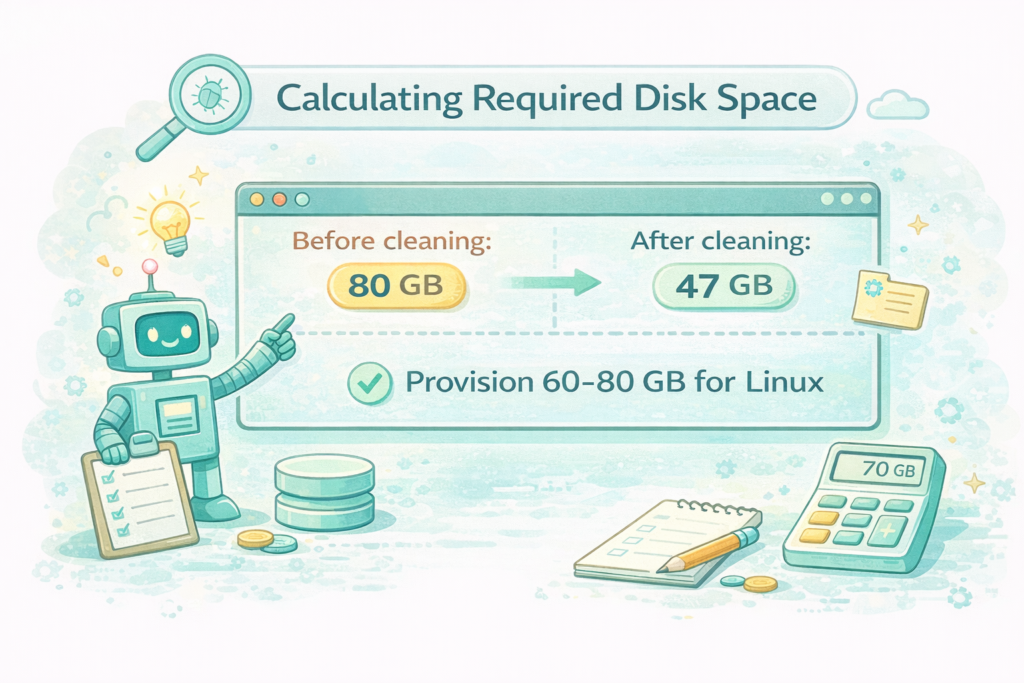
df -h /The df command (disk free) shows the amount of storage used on the system. The -h flag displays the output in a human-readable format, and / specifies the mount point for which I want to check the disk usage. On my system, the root partition used around 80 GB of space. At first glance, this might suggest that I should provision a new partition of 80 GB for the new OS.
Well no, because the next question that follows is where exactly is occupying this 80 GBs? Is this space used by installed packages, or something else entirely? To find out, I started digging deeper to see where the disk space was actually going.
Cleaning Existing System
Removing Orphaned Packages
Since I was going down this rabbit hole, I also figured there are many installed programs that I don’t even use. So, I first need to remove these unused programs to get an exact estimate. This brought up the next obvious point is that I need to also remove dependencies of these packages as well as unused dependencies of programs previously installed.

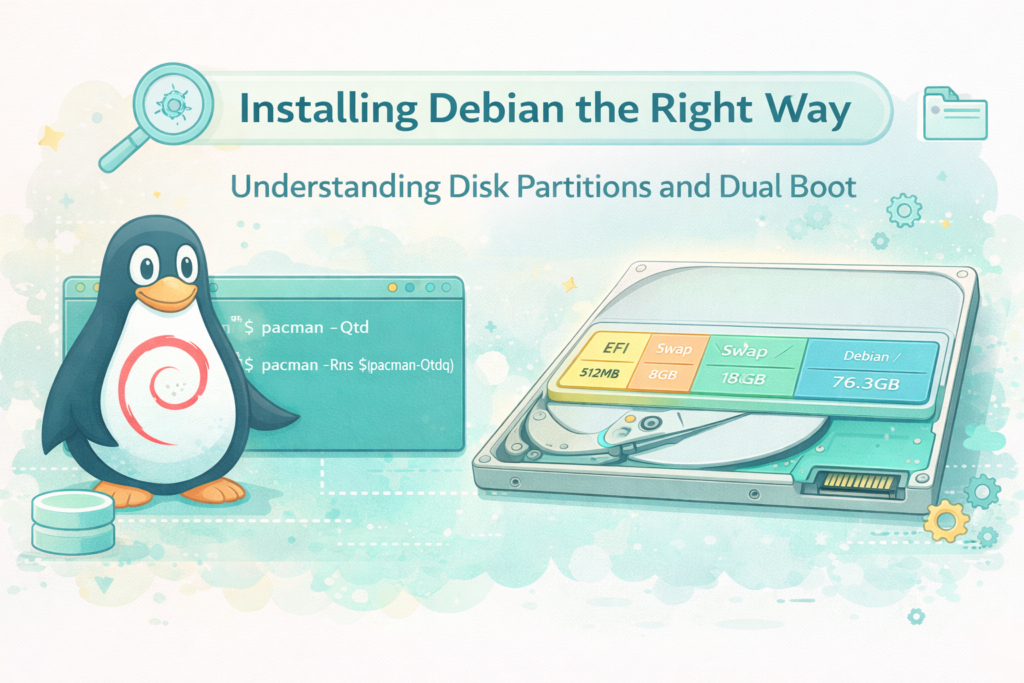
Package managers maintain a dependency graph of all installed software. When you install a program, the package manager installs its required dependencies as well. Later, when you remove the main program, some dependencies may remain if no other package uses them. These leftover dependencies are called orphaned packages, and tools like pacman can detect and remove them. Using AI, I got the command:
pacman -Qtd
pacman -Rns $(pacman -Qtdq)The first command queries the local package database and lists all orphaned packages and their version numbers. The 2nd command then uses the first command with the quiet flag (q) to list only the package names and remove it and its dependencies and configs. This way, the orphaned package, its config and dependencies are all removed, effectively cleaning up the system. Note that these commands are specific to pacman and not directly applicable in other distros.
So, after removing orphaned packages, I came to realize that since I am switching OS, my workflow will include installing packages similar to what is already installed. I have a habit of regularly removing unused programs, so I am not someone who keeps a lot of unused packages. Hence, for a realistic estimate, I should not remove existing programs.
Cleaning System Cache
The next step of the process is to remove all cache and temporary files that help speed up execution of other packages. Many programs maintain local caches to improve performance.
Package managers cache downloaded packages so they don’t need to be downloaded again during reinstallations. Docker stores image layers to speed up container creation. Over time these caches can accumulate and consume large amounts of disk space.
The first and foremost thing to clear was the package cache that the package manager creates. This is simple and straightforward with pacman:
pacman -SccCleaning System Logs
Next up, I also know that logs take up a lot of space usually a few GBs if not cleaned. Since I don’t need old logs, I run the journal clean command:
sudo journalctl --vacuum-time=7dThis simply removes all logs that are more than 7 days old. I check the before and after size of the journal to verify this:
journalctl --disk-usageThe storage jumps from ~2GB to 1.12 MB. That is a massive drop.
Cleaning Docker images
Next up, I need to clear the cache created by Docker. This has historically been one of the biggest space consumers for my workflow. I remove all cache using the command:
docker system prune -af && docker volume prune -afHowever, I have previously found myself in situations where my disk was completely full and I had no idea how. Upon examining my disk usage, I found that it was Docker that occupied ~10 GBs of space with its cache. So, I aliased the above command and I run it periodically to keep my disk usage in check.
alias dockerprune='docker system prune -af && docker volume prune -af'Manually reclaiming unused space
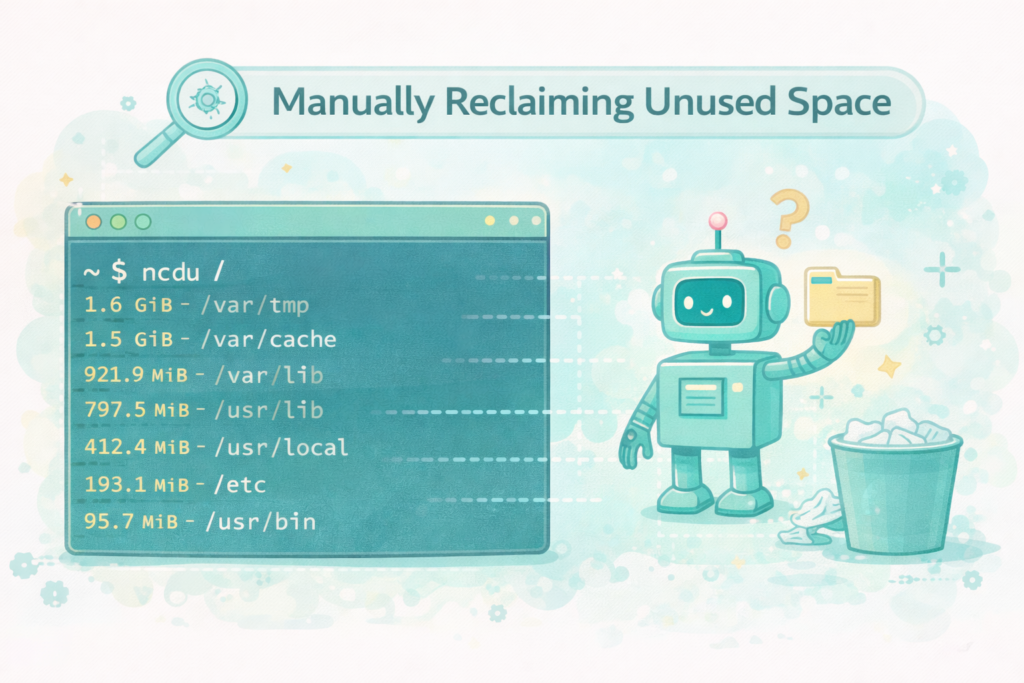
Now that I have cleaned the system on whatever the system thinks is worth removing, it is time to find out things that the system can’t find. This is where I use a tool called “ncdu”. It analyzes the entire directory and lists folders in descending order of space occupied. I can use this to quickly navigate and find the directories that occupy the most amount of space and see if they need cleaning.
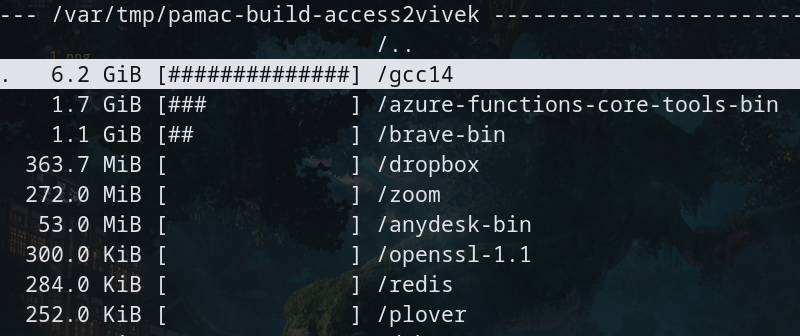
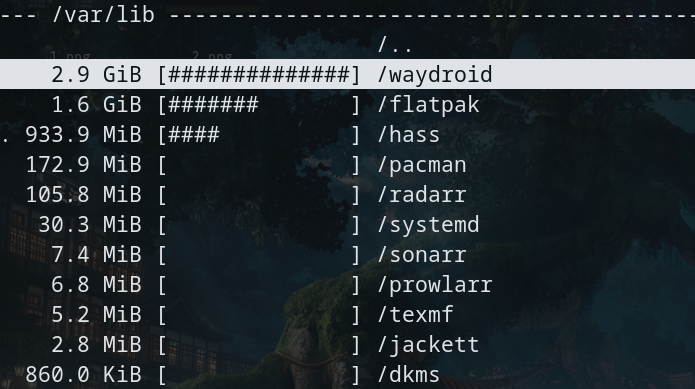
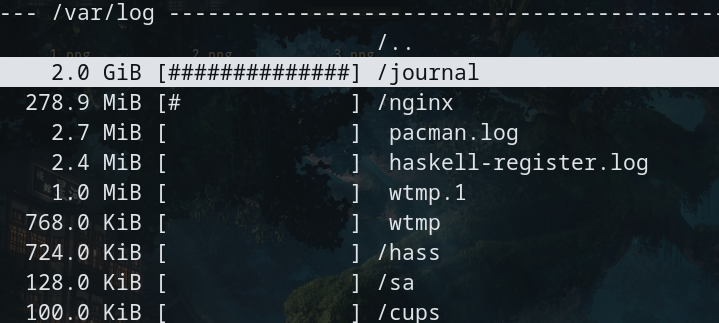
So, I keep navigating to the directories that occupy large disk space using the TUI and keep asking the AI if the folder and files can be safely deleted. I do this for most of the folders in the root partition that occupy large disk spaces. Unsurprisingly, the most amount of junk was found in the following places:
- /var/tmp
- /var/lib
- /var/log
- /var/cache
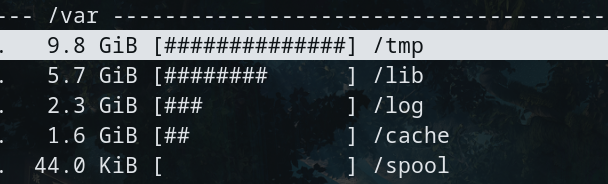
According to the Linux Filesystem Hierarchy Standard, /var contains variable data such as logs, caches, and application state. Because this data changes frequently, it can grow significantly over time.
Calculating required Disk
After cleaning caches, orphaned packages, logs, and Docker artifacts, my disk usage dropped significantly from 80GB to 47GB. This was a useful reminder that the actual operating system occupies far less space than we often assume. Much of the disk usage on development machines comes from build artifacts, caches, containers, and temporary files.
So, I now know the size required by the actual OS and tools that I will most likely need. On top of this, I also know that I need some Buffer for other packages, cache, etc. Hence, I would require around 60-80 GBs for any OS for my regular use. Of course varies based on the intended user. It will be very low for server, or power users, or those having a fixed system and tools. But for general use, 70 GBs is around the perfect amount of space required for the OS for me.
One important insight that I gained during this entire operation is that I have currently over-provisioned my current OS. Since I was new to Linux when I installed Manjaro, I didn’t know how much space I would need for now OS. So, I had provisioned 150 GBs for the OS just to be safe. Now I know that the safe region would be ~70 GBs or even less for my use case if I maintain my system.
Creating a new Partition
This is the next step that is the most critical step of the entire operation as this is irreversible. Since all of my disk is already occupied by the various partitions already created, I have to figure out how to carve out a partition for myself.
I can in fact, split the current OS partition into 2 partitions, 1 for each OS, based on the current usage. However, after lots of planning and suggestions from ChatGPT, I figured the best course of action is to shrink the existing Home partition, and create a new partition from the newly carved space. I had around 100 GBs left in this partition which I could safely use for the new partition. Since the home partition was in the end, shrinking it would be safest.
One note is that I cannot re-partition the Disk while it was still in use. This will make the system unusable and susceptible to crash if some part of the Disk is used by the OS. Hence, the OS does not allow any partition related operations on already mounted block device. I will have to boot the OS from a USB drive to partition my hard drive. This is why all OS installers come with a partitioning tool to achieve this.
So, everything was now set up and I was ready to install Debian!
Creating the bootable USB drive
Now, I had to make the USB drive bootable by “burning” the OS into it. I used to have trouble with this in the past, but now it seems like a very straightforward process. Linux installers provide the complete iso file which needs to be written as a raw disk image onto a USB drive to make it bootable. So, I download the iso from official Debian website.
Earlier I used tools like Rofi to burn the iso onto the USB drive. But now I know that we don’t really need those UI tools. All I do is use lsblk to list the devices after connecting the USB drive and note the names of the two block devices. Then, run the following command (courtesy of ChatGPT)
sudo dd if=/path/to/debian.iso of=/dev/sdX bs=4M status=progress oflag=syncNote that I have replaced of=/dev/sda with of=/dev/sdX. The exact name of the block device might be different on everyone’s system. Also, this is done to avoid blind copy-paste and risk overwriting your data if any.
Writing to USB drive takes a few minutes and we are ready for next step.
Installing Debian
This was surprisingly the easiest part of the entire process. Just boot from the USB drive and follow the GUI installer while creating the partitions as finalized earlier. Note that booting from USB device takes a little bit of understanding of BIOS and boot priority reordering, but that is not covered here.
The installer also lets you pick a Desktop Manager, so I select the default (GNOME) for now. I didn’t want to worry about the Desktop environment for now as I just wanted to start using Debian with something.
After a few minutes, the new OS was installed and ready to be used! Post installation, I added my user to the sudo group and installed a few basic required packages while updating and upgrading apt. And we are done!
Future Plans
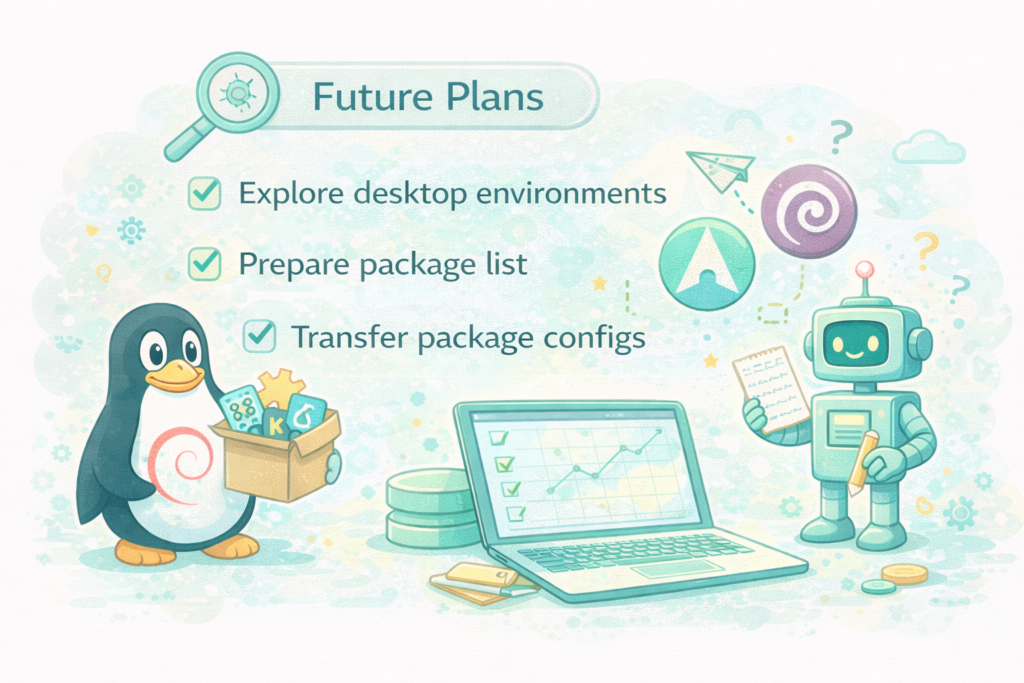
I am now fully ready to start working in Debian. I will start migrating from Arch to Debian by porting my applications and workflow eventually to Debian. While doing so, here are the things that I will also be looking into.
Experimenting with Desktop Environment
Although I use KDE Plasma right now, I am planning to switch my Desktop Environment. KDE offers a lot of customizations, but I feel the amount of customization is way too much for me and I don’t use most of it anyway.
My workflow is very simple and doesn’t really require too much Desktop Manager intervention. I have a single program open on a single screen in full screen with transparency wherever possible because I have a clean desktop with 0 icons. I just want to appreciate the wallpaper that keeps changing regularly.
dwm seems like a good choice because it is light-weight and simple and suckless. Any recommendations?
Porting packages used
I would need to maintain the list of packages that I use somewhere such that when I switch OS later on, I don’t have to manually figure out which packages I am using. Since I am using pacman, listing all the user installed packages is pretty straightforward. Storing these in a repository would make installing packages in the new OS simpler.
Porting application configs
Along with used tools, I would also need a system to easily transfer all configs from this system to the next. I currently use a bare repository to track my config files. However, I don’t update it regularly or every time I make a change to my config files.
In fact, I might not even have added all my config files there. So, moving to a new OS will help me figure out all the tools that I am accustomed to.
Learnings
During this entire process, here are the key learnings that I gathered:
- Most Linux systems actually need far less space than we assume.
- A system accumulates “junk” over time and should be cleared periodically.
- Cache and temporary files consume huge amounts of disk space.
- The package manager is a very important piece of the OS and it allows you to manage applications and dependencies really well
- Dependency management is not easy and requires constant monitoring and cleaning.
- Understanding disks and partitions is important for getting to know your OS and making multi-boot setups easy.
- You don’t need GUI tools for most system tasks.
Leave a Reply